The Resin Tools Every Epoxy Crafter Actually Needs
The LET’S RESIN silicone measuring cup kit is our overall pick because accurate ratios prevent most cure failures. The Bernzomatic ST2200T micro torch is the fastest fix for surface bubbles, and a digital scale like the Ozeri Pronto is the inexpensive tool that quietly improves every pour.
The LET’S RESIN silicone measuring cup kit heads this list because inaccurate mixing ratios cause more sticky, tacky, never-quite-cured pours than any other single mistake. The Bernzomatic ST2200T micro torch is the quickest way to clear surface bubbles, and a digital scale such as the Ozeri Pronto quietly improves consistency on every batch you mix.
Resin work is frustrating for beginners because the failures rarely come from the resin itself: bubbles, cloudiness, soft patches and dull edges are equipment problems. The awkward part is that the useful tools come from completely different aisles, from kitchen scales to plumbing torches to rotary tools. We compared mixing accuracy, bubble removal methods, cure support, finishing capability and what makers report about cleaning resin off each tool to shortlist the seven below.
Our top picks

LET’S RESIN Silicone Measuring Cups and Mixing Kit
Clearly marked silicone cups let you hit ratios accurately, and cured resin peels straight out so the same cups go back into service instead of the bin. The kit includes stirring sticks and a larger mixing cup, covering the basics of every pour. Makers report the peel clean property alone changes how much waste a resin project generates.
Pros
- Cured resin peels out for genuine reuse
- Clear dual unit markings support accurate ratios
- Includes stirring sticks and mixing containers
Cons
- Flexible walls can distort readings if not on a flat surface
- Pigment staining builds up over time

Bernzomatic ST2200T Micro Torch
A quick pass of the flame across a fresh pour pops surface bubbles almost instantly, faster and more precisely than a heat gun and without disturbing the resin. The adjustable flame and instant ignition make it easy to control. Makers report a torch is the single tool that most improves the clarity of a finished piece.
Pros
- Clears surface bubbles in seconds
- Precise flame does not blow resin around like a heat gun
- Compact enough for detailed work on small pieces
Cons
- Butane must be bought and refilled separately
- Open flame demands care around moulds and fumes

Wagner Spraytech HT400 Heat Gun
For river tables and large panels, a heat gun covers far more surface than a torch and helps resin self level as well as releasing bubbles. The HT400 runs at a temperature that suits epoxy without scorching, and it doubles for shrink wrap and paint stripping around the workshop. Makers report it as the better choice when a torch would take too long to cover a big surface.
Pros
- Covers large surfaces quickly
- Encourages resin to self level as it warms
- Useful for many other workshop tasks
Cons
- Airflow can push resin around on shallow pours
- Too aggressive for fine detail or small moulds

Ozeri Pronto Digital Multifunction Kitchen Scale
Many epoxy systems mix by weight rather than volume, and a scale reading to a single gram removes the guesswork that measuring cups leave behind. The tare function lets you add resin, zero the display and add hardener in one container. Makers report switching from volume to weight measurement as the change that fixed their recurring soft cure problems.
Pros
- Accurate weight based mixing for weight ratio systems
- Tare function simplifies single container mixing
- Inexpensive addition to any resin setup
Cons
- One gram resolution is coarse for very small batches
- Needs protecting from drips with a covering

TCP Global 2.5 Gallon Pressure Pot
Curing a casting under pressure compresses any remaining bubbles until they are effectively invisible, which is the only reliable route to genuinely clear thick castings. It requires an air compressor, so this is a step up in commitment rather than a beginner purchase. Makers report it as the dividing line between hobby pieces and gallery quality work.
Pros
- Produces genuinely bubble free thick castings
- Integrated regulator and gauge for controlled pressure
- Also usable for silicone mould making
Cons
- Needs an air compressor to work at all
- Bulky and requires careful handling under pressure
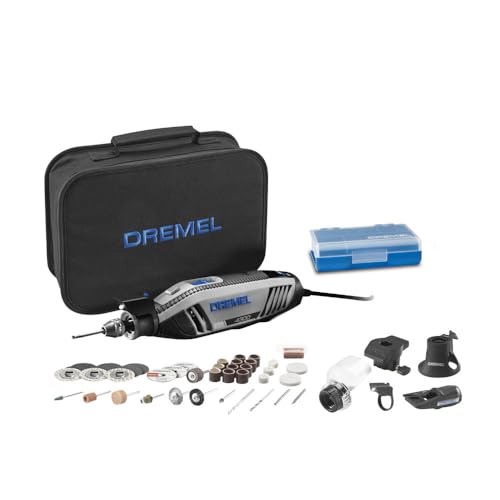
Dremel 4300 Rotary Tool Kit
Once a piece has cured, the work shifts to trimming sprues, sanding edges and drilling holes for findings, and a rotary tool covers all of it. Variable speed matters because resin melts and gums up at high revolutions. The kit includes sanding drums, cutting wheels and polishing accessories that suit resin directly out of the box.
Pros
- Handles trimming, sanding, drilling and polishing
- Variable speed avoids melting or gumming resin
- Tool free accessory changes speed up finishing
Cons
- Creates fine resin dust that requires a mask and extraction
- Easy to remove too much material at high speed

SUNUV SUN3 UV LED Lamp
UV resin cures in minutes rather than the day or more that two part epoxy needs, and a proper lamp beats a small handheld torch for even curing across a piece. Timed settings and a wide LED array cover most small moulds and jewellery pieces. Makers report the even coverage is what prevents the tacky patches that handheld UV lights leave behind.
Pros
- Even coverage prevents tacky uncured patches
- Cures small pieces in minutes rather than hours
- Removable base accommodates taller moulds
Cons
- Only works with UV resin, not two part epoxy
- Chamber size limits the piece dimensions it can cure
How they compare
| # | Model | Material | Best for | Score | Price |
|---|---|---|---|---|---|
| 1 | LET’S RESIN Silicone Measuring Cups and Mixing Kit | Flexible silicone | Best overall | 9.4 | Check price |
| 2 | Bernzomatic ST2200T Micro Torch | Butane, refillable | Best for bubble removal | 9.2 | Check price |
| 3 | Wagner Spraytech HT400 Heat Gun | Two settings, 750 and 1000 degrees Fahrenheit | Best for large pours | 9.0 | Check price |
| 4 | Ozeri Pronto Digital Multifunction Kitchen Scale | 1 gram increments | Best for accurate ratios | 8.8 | Check price |
| 5 | TCP Global 2.5 Gallon Pressure Pot | 2.5 gallons | Best for bubble free casting | 8.6 | Check price |
| 6 | Dremel 4300 Rotary Tool Kit | Variable, 5000 to 35000 rpm | Best for finishing and drilling | 8.3 | Check price |
| 7 | SUNUV SUN3 UV LED Lamp | 48 watt LED array | Best for UV resin | 8.0 | Check price |
What to look for
Accurate mixing prevents most resin failures Sticky surfaces, soft patches and pieces that never fully harden almost always trace back to an incorrect ratio or incomplete mixing. Check whether your epoxy specifies a ratio by volume or by weight, since the two are not interchangeable and using the wrong method will be off by a meaningful margin. Mix for the full time the manufacturer states, scraping the sides and bottom of the cup, then transfer to a second clean cup and mix again to catch unmixed resin clinging to the walls.
Three different ways to deal with bubbles Bubbles come from mixing, from porous materials and from the resin itself. Stirring slowly rather than whipping reduces them at the source. A torch or heat gun clears the ones that rise to the surface, since heat breaks the surface tension. Bubbles trapped deep in a thick casting only disappear under pressure, which is what a pressure pot is for. Match the tool to where the bubbles actually are rather than buying all three at once.
Temperature control is an invisible variable Epoxy cures through an exothermic reaction that is highly sensitive to ambient temperature. A cold workshop leads to slow cures, more bubbles and a cloudy finish, while a hot room accelerates the reaction and shortens working time dramatically. Most systems specify a range around 70 to 75 degrees Fahrenheit. Warming resin bottles in a water bath before mixing thins the resin, which helps bubbles escape on their own.
Safety equipment is not optional Uncured epoxy is a sensitiser, meaning repeated skin contact can produce an allergic reaction that develops suddenly after months of trouble free use. Nitrile gloves, not latex, are the standard choice, along with good ventilation and a respirator rated for organic vapours when working with larger volumes. Sanding cured resin creates fine dust that should not be inhaled, so a mask and dust extraction belong with the rotary tool rather than as an afterthought.
Questions worth asking
What tools do I need to start working with resin?
The minimum set is graduated mixing cups, stirring sticks, nitrile gloves, a level work surface and a way to remove surface bubbles such as a torch or heat gun. A digital scale is worth adding immediately if your resin mixes by weight. Everything else, including pressure pots and rotary tools, can wait until specific projects demand them.
Why does my resin have so many bubbles?
The usual causes are stirring too vigorously, a cold working environment that keeps the resin thick, or air trapped in porous inclusions like wood or paper. Stir slowly, warm the bottles in a water bath first, seal porous items with a thin coat before embedding, then torch the surface once poured.
Can I use a hair dryer instead of a heat gun?
Not effectively. A hair dryer does not reach a high enough temperature to break bubble surface tension and its airflow tends to blow dust into a wet pour. A small butane torch is the more reliable and precise option.
Do I really need a pressure pot?
Only for thick clear castings where absolute clarity matters, such as paperweights or deep jewellery pieces. Shallow pours, coasters and coatings are handled perfectly well by a torch. A pressure pot also requires an air compressor, so treat it as a considered upgrade rather than a starting purchase.
How do I clean tools after using resin?
Wipe uncured resin off with paper towel and isopropyl alcohol before it sets, since cured epoxy is very difficult to remove. Silicone cups and mats are the exception, as cured resin peels straight off them. Never rinse resin down a sink drain.
What is the difference between UV resin and epoxy resin?
UV resin is a single part product that cures in minutes under UV light and suits thin layers and small pieces. Two part epoxy mixes resin with hardener, cures over many hours and can be poured much thicker. They need different equipment, so decide which you are using before buying a lamp.
Why is my cured resin still sticky?
Almost always an inaccurate ratio, insufficient mixing, or curing below the recommended temperature. Sticky patches in specific spots point to unmixed resin from the cup walls, while an entirely tacky surface points to a ratio error. Sticky resin cannot be rescued and the layer needs removing before repouring.
What safety gear should I use with resin?
Nitrile gloves every time, good ventilation, and a respirator rated for organic vapours when pouring larger volumes or working in an enclosed space. Add a dust mask and eye protection when sanding or cutting cured pieces. Follow the safety data sheet for the specific product you are using.
Our take
Start with accurate measurement, since the LET’S RESIN silicone cups and a gram scale like the Ozeri Pronto solve more problems than any other purchase in this list. Add the Bernzomatic ST2200T torch for surface bubbles and you have covered the failures that frustrate most beginners. Pressure pots, rotary tools and UV lamps are worth adding later, once a specific project actually calls for them.