How to Choose a Badge Press Machine for Your Shop
VEVOR Button Maker Machine 58mm ranks first because a cast iron body and rotating twin die base hold alignment through long runs. Yescom 1 Inch Button Maker Machine gives the lowest commitment route into pin badges. Mophorn Button Maker Machine 4 in 1 covers four diameters from a single frame.
VEVOR Button Maker Machine 58mm is the badge press most makers should buy, because 58mm suits real artwork and the heavy frame keeps crimps even. Small classroom pins and low outlay point to the Yescom 1 Inch Button Maker Machine. Anyone selling several badge sizes needs the Mophorn 4 in 1 instead.
Listings make these machines look identical, since nearly all of them share the same cast lever frame from the same handful of factories. Differences hide in die machining and frame stiffness, and those two things decide whether a shell crimps evenly or the finished badge spins on its pin. We compared frame material, die station layout, supplied cutters and consumables across seven presses, then weighed what owners report about alignment drift after a few hundred pulls.
Our top picks

VEVOR Button Maker Machine 58mm
At 58mm, artwork has room for a logo and readable type, which is why event pins and band merch settle on this diameter. Cast iron mass keeps the base planted through a fast run without clamping. Rotating between the two die stations needs no tools, so loading and pressing overlap instead of queuing.
Pros
- Cast iron mass stops the frame walking during runs
- Rotating twin stations keep a batch moving
- Circle cutter and starter consumables come in the box
Cons
- Die is fixed to one diameter with no upgrade path
- Weight rules it out for carrying to markets

Yescom 1 Inch Button Maker Machine
One inch pins remain the standard for classrooms, campaigns and craft fairs. A smaller die needs less force per pull, so an afternoon of pressing tires your arm far less. Consumables in this diameter come from many sellers, which matters when a restock has to arrive before an event.
Pros
- Small die keeps handle effort low over long sessions
- Metal frame rather than a pressed sheet shell
- One inch shells and backs are stocked everywhere
Cons
- Face area is too small for detailed artwork
- No route to a larger diameter later

Mophorn Button Maker Machine 4 in 1
Four interchangeable die sets bolt into one cast frame, covering small pins through to larger badges. Swapping a die takes a couple of minutes with the supplied tool, so batching one size at a time is the sensible workflow. Owners report the kit pays off only when the size range is genuinely needed.
Pros
- Four diameters run from one frame and one bench space
- Matching circle cutter supplied for every die set
- Avoids buying and storing separate machines
Cons
- Die swaps are too slow to switch mid run
- Alignment needs rechecking after every changeover

Techtongda Button Maker Machine 32mm
A 32mm face sits between the tiny one inch pin and the roomier 58mm badge, which fits logos and short type without bulk. Squared off casting keeps the base flat on a bench, so it does not rock under load. Die machining looks tidier than the class usually manages, which shows in cleaner shell edges.
Pros
- Useful middle diameter for logos and short text
- Flat squared base sits steady without clamping
- Clean die machining gives neat crimped edges
Cons
- Locked to one diameter like most fixed presses
- Printed instructions are thin for a first setup

BAOSHISHAN Badge Button Maker 75mm
At 75mm a badge carries a full name at conference reading distance. More shell area means more crimping force, so the handle needs a firm pull and a solid bench underneath. Shells and backs in this diameter come from fewer sellers, which is worth checking before a business depends on them.
Pros
- Face area fits names read from across a room
- Heavy casting absorbs the extra crimping force
- Suits conference, campaign and awareness badges
Cons
- Handle effort per pull is noticeably higher
- Fewer suppliers stock consumables this large

ChiButtons 25mm Badge Press
A short handle throw and a forgiving die suit hands that load the shell slightly off centre. That tolerance is exactly what a class taking turns needs. Output speed and finish sit below production machines, so treat it as teaching equipment rather than a workshop tool.
Pros
- Die tolerates slightly off centre loading
- Short lever throw suits smaller hands
- Simple enough for supervised group sessions
Cons
- Slower than production oriented presses
- Light alloy frame needs holding during a pull
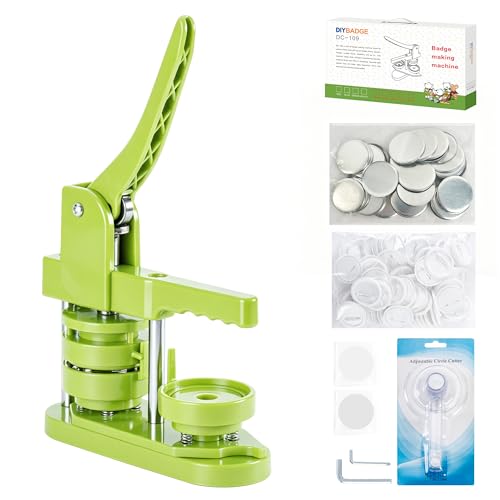
MYRRO Button Badge Maker Machine 58mm
A deep stack of shells, backs and mylar discs ships with the press, enough to work through a first market stall without a separate order. Alloy casting weighs less than the VEVOR, so clamping to the table edge helps during quick runs. As a ready to go 58mm starter package, contents are the selling point.
Pros
- Ships with enough consumables for a first stall
- 58mm shells restock easily from many sellers
- Complete kit needs nothing else to start
Cons
- Lighter alloy frame benefits from clamping
- Die alignment is worth checking before the first run
Compared at a glance
| # | Model | Badge size | Best for | Score | Price |
|---|---|---|---|---|---|
| 1 | VEVOR Button Maker Machine 58mm | 58 millimetres | Best overall | 9.4 | Check price |
| 2 | Yescom 1 Inch Button Maker Machine | 25 millimetres, one inch | Best value | 9.2 | Check price |
| 3 | Mophorn Button Maker Machine 4 in 1 | Four interchangeable die sets | Best for multiple sizes | 9.0 | Check price |
| 4 | Techtongda Button Maker Machine 32mm | 32 millimetres | Best for small badges | 8.8 | Check price |
| 5 | BAOSHISHAN Badge Button Maker 75mm | 75 millimetres | Best for large badges | 8.6 | Check price |
| 6 | ChiButtons 25mm Badge Press | 25 millimetres | Best for classrooms | 8.3 | Check price |
| 7 | MYRRO Button Badge Maker Machine 58mm | 58 millimetres | Best for craft stalls | 8.0 | Check price |
What to look for
How to choose a badge press machine Diameter comes first, because almost every press is machined for one shell size. Frame material comes second, since a flexing arm produces uneven crimps. Twin die stations matter third, as they let one badge press while the next loads. Everything else on a listing is packaging.
Which badge size should you press? One inch and 25mm pins carry a slogan or a simple icon and nothing more. At 32mm a logo with short type reads clearly. The 58mm size handles real artwork and dominates band merch and event pins. Jumping to 75mm gives name badge legibility across a room, with fewer suppliers stocking the parts.
Why frame rigidity decides badge quality A badge forms when shell, artwork, mylar and back get squeezed into a single crimp. Frame flex during that stroke leaves the crimp uneven, and the badge then pops apart or spins on its pin. Heavier cast iron bodies flex less and stay planted. Presses light enough to lift one handed should be bolted or clamped to the bench.
How to set up artwork and cutters for clean badges Design needs a bleed ring that wraps around the shell edge, so the visible area is smaller than the disc you cut. A dedicated circle cutter, supplied with every press here, gives more repeatable discs than scissors. Print one test sheet, press a single badge, then adjust the template. Skipping that step is how a hundred badges end up with a cropped logo.
Questions worth asking
What size badge press should you buy first?
The 58mm size is the most versatile, with room for real artwork and wide consumable supply. Choose 25mm for small pins only, and 75mm when badges must be read from a distance.
Can one badge press make several sizes?
Only multi die kits like the Mophorn 4 in 1. Standard presses machine their die for a single shell diameter. Batch each size rather than alternating, because a swap takes minutes.
What consumables does each badge need?
Four parts per badge: a metal shell, your printed paper disc, a clear mylar disc over the print, and a back with a pin, magnet or clip. Sets are sold matched to each diameter.
What paper works best for badge artwork?
Standard printer paper is what most sellers supply, since the mylar layer adds gloss and protection. Heavy card can be too thick to crimp cleanly, so test a single badge before switching stock.
How many badges can you press in an hour?
Owners report roughly one to three badges a minute once artwork is precut and both die stations are loaded. Cutting discs, not pressing them, usually sets the real limit.
Do you need to bolt a badge press to the table?
Cast iron presses generally stay put unaided. Lighter alloy frames creep across a bench during fast runs, so clamping makes crimps more consistent and pressing less tiring.
Why do badges come out loose or spinning?
That is a crimping fault, usually from an incomplete handle stroke, misaligned dies or a paper disc cut slightly oversize. Push the lever through its full travel and recheck alignment before blaming the shells.
Is a badge press machine the same as a button maker?
Yes, the two terms describe one tool and split by region. Badge press is common in the UK and Australia, while button maker dominates in North America.
Which badge press suits a school or classroom?
A forgiving 25mm press such as the ChiButtons tolerates off centre loading and needs a short lever pull. Small dies also keep the required force within reach of younger hands.
Final word
VEVOR Button Maker Machine 58mm is the press worth buying for most makers, because its cast iron mass and rotating die base hold alignment across a long run at the most useful diameter. Small pins and a low starting outlay point to the Yescom 1 Inch Button Maker Machine. Choose the Mophorn 4 in 1 only when several badge sizes are part of the job.


